

Adding Google Ads UTM parameters allows marketers to track the performance of their Google Ads.
With the right setup, they can even track the UTM parameters directly in their lead form (using LeadSources).
Let’s go through 3 easy steps to add UTM parameters automatically in all your campaigns.
Then, we will review how to track these UTM parameters directly into your form.
What are UTM parameters in Google Ads?
UTM parameters are specific URL parameters used to track and evaluate the success of marketing campaigns.
They help digital marketers understand user interactions across various channels, such as social media, email campaigns, and online advertisements.
UTM parameters are appended to a URL, separated by the “&” symbol:

By incorporating UTM parameters into URLs, marketers can assess the effectiveness of their marketing efforts.
When a user clicks a URL containing UTM parameters, tools like LeadSources capture this data, and populate it into your lead form.
This allows marketers to analyze which channels, campaigns, or ads drive the most leads and make educated decisions about which ads to promote and which to cancel.
Why tracking Google Ads UTM parameters?
Implementing Google Ads UTM parameters allows you to track the performance of your Google Ads.
How?
Let’s say you append the following UTM parameters to your landing page on Google Ads:
https://www.example.com/?utm_source=google&utm_medium=cpc&utm_campaign=campaignid1&utm_term=keyword&utm_content=ad2
When a user clicks your ad, the UTM parameter values are tracked by Google Analytics.
From Google Analytics, you can then track which source, medium, campaign ID, keyword, and ad your web traffic, leads and conversions are coming from.
However, Google Analytics doesn’t tell you everything…
You know the saying, “20% of your efforts bring 80% of the results“.
That couldn’t be truer for Google Ads, where 20% of your ads bring 80% of your revenue.
The problem is that Google Analytics won’t tell you what these 20% are (and no one is talking about it).
I explain.
Most marketers get a report from Google Analytics that looks like this:
- Ad #1 generated 10 leads
- Ad #2 generated 5 leads
- Ad #3 generated 1 lead
With Google Analytics, you don’t know which ad a given lead came from. Sure Ad number 1 generated 10 leads, but what are these leads? What’s their name?
So when a lead converts into a paid customer, you don’t know from which ad this customer came.
But as marketers, this is not enough!
We need to know exactly which campaign, ad, and keyword each lead came from so that when these leads convert into customers, we know which exact campaign, ad, and keyword generated the sale.
Only then can we make educated decisions about which campaign, ad, and keyword to promote and which one to cancel.
Fortunately, there is a solution…
Use LeadSources to know exactly which campaign, ad, and keyword each lead comes from.
LeadSources populates Google Ads UTM parameters directly into your lead form:

By tracking the Google Ads UTM parameters for each lead, you can see which campaigns, ads, and keywords generate revenue.
With this data, marketers can identify the 20% of their ads that bring 80% of their revenue. Users of LeadSources have reported reducing their ad spending by 40% by simply removing the 80% of their ads that bring dead leads and promoting the 20% of their ads that bring value leads (aka revenue).
Do you want to save 40% on ad spending? Try LeadSources for free for 14 days.
How to add Google Ads UTM parameters?
Step 1: Choose where to add your UTM parameters
You can add your UTM parameters at different levels in Google Ads:
- Campaign level
- Ad group level
Choosing the right level depends on the campaign’s complexity, the need for customization, and the ease of management. Use the table below to select the level that fits your needs:
| Level | Purpose | Advantages | Disadvantages |
|---|---|---|---|
| Campaign | Applies the tracking template to all ads and ad groups within the campaign. | Ensures consistency across the entire campaign. Easier to manage if the same tracking parameters are needed for all ads. |
Limited flexibility: any changes affect all ad groups and ads within the campaign. Not suitable for campaigns with diverse tracking needs across ad groups or ads. |
| Ad Group | Applies the tracking template to all ads within the specific ad group. | Provides more flexibility than campaign-level tracking by tailoring tracking per ad group. Useful for grouping similar ads and customizing tracking for specific ad groups |
Requires manual setup for each ad group, which can be time-consuming. Changes at this level won’t affect ads in other ad groups, reducing consistency. |
Step 2: Add the Google Ads UTM parameters
1. Head to your Google Ads account.
2. Select the level where you want to add your UTM parameters:
To add UTM parameters on the Campaign level
- Click Campaigns
- Hover the campaign you want to add UTM parameters to
- Click the setting gear icon that appears
- Scroll down and click on Additional Settings
- Click Campaign URL options to open the Tracking Template
To add UTM parameters on the Ad group level
- Click Ad groups
- Hover the ad group you want to add UTM parameters to
- Click the setting gear icon that appears
- Scroll down and click on Additional Settings
- Click Ad group URL options to open the Tracking Template
3. Add the following tracking template:
{lpurl}?utm_source=google&utm_medium=cpc&utm_campaign={campaignid}&utm_term={keyword}&utm_content={creative}
This should look like this:
Click Save.
{lpurl} is a ValueTrack parameter that inserts automatically the landing page of your campaign. For example, if your campaign redirects to the URL https://yoursite.com/landing-page/, then {lpurl} is replaced by the value https://yoursite.com/landing-page/
We have added the following Google Ads UTM parameters to our URL:
| UTM parameters | Explanation |
| utm_source | A UTM parameter that indicates the source of your traffic. You can call it “google”. This UTM parameter can be populated into your lead form by using LeadSources. |
| utm_medium | A UTM parameter that indicates the marketing medium (E.G. cpc, banner, email). |
| utm_campaign | A UTM parameter that indicates the marketing campaign. Use the ValueTracker {campaignid} to automatically insert your campaign ID in your final URL. This value is populated directly into your lead form when using LeadSources. |
| utm_term | A UTM parameter that indicates the keyword that was searched. Use the ValueTracker {keyword} to automatically insert the keyword into your final URL. The keyword is populated into your lead form when using LeadSources. |
| utm_content | A UTM parameter that indicates the ad creative. Use the ValueTracker {creative} to automatically insert the ad ID into your final URL. The ad ID is populated into your lead form when using LeadSources. |
Step 3: Test your UTM parameters
You want to ensure that the UTM parameters you have set up in your tracking template are displayed properly when a user clicks your ad:
- From the URL options, click the Test link, it will open your landing page
- Check that the ValueTrack parameters are replaced by the correct values. E.G. {lpurl} is replaced by your landing page URL
- Submit your lead form (optional): If you are using LeadSources to capture the UTM parameters into your lead form, check that the following UTM parameters are populated in your form submission:
- Source
- Campaign
- Term
- Content
How to track Google Ads UTM parameters in your lead form?
You are running Google Ads, but don’t know which campaigns are generating each lead?
This is a common issue: Google Ads only tracks the total number of leads generated by a campaign, ad, or keyword, but does not provide lead-level data.
LeadSources allows you to track Google Ads UTM parameters on a lead level, by inserting UTM parameters in your lead form.
You can then generate reports like “Keywords that generated the most leads”, and “Ads that generated the most sales” to decide which keywords, ads, and campaigns to promote or cancel.
Let’s see how you can use LeadSources to track Google Ads UTM parameters in your form.
Step 1: Add LeadSources in the head tag of your website

Sign up to Leadsources.io.
Add the LeadSources code to the head tag of your website. No coding skills are needed.
Simply follow this easy step-by-step guide.
Step 2: Add the hidden fields in your form builder
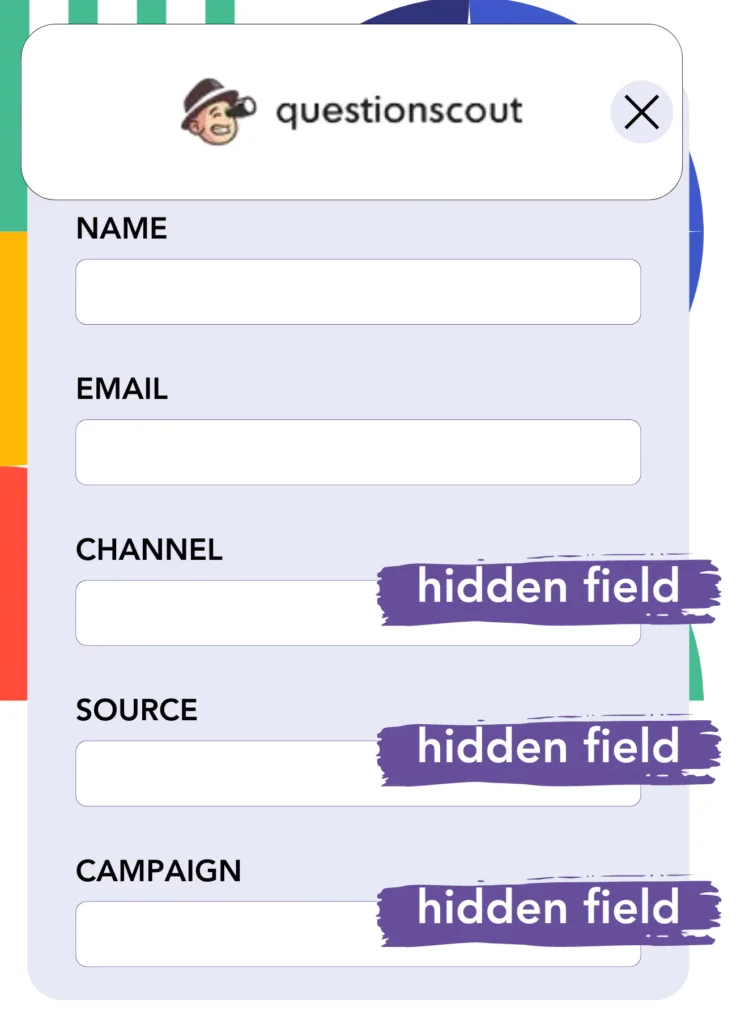
When users submit your form, LeadSources automatically fills in the hidden fields with the following Google Ads UTM parameters:
- UTM_source
- UTM_campaign
- UTM_term
- UTM_content
- (and more)
To do this, follow the step-by-step guide to add hidden fields in your form builder.
LeadSources will then save the Google Ads UTM parameters directly in your form.
Step 3: Capture the Google Ads UTM parameters in your form
When a user clicks your Google Ads ad, LeadSources fetches the Google Ads UTM parameters from the URL and populates them into the hidden fields of your form.
When a user submits your form, the Google Ads UTM parameters are sent to the form’s submissions page, alongside the lead’s details (name, email, etc.):
Step 4: Create performance reports
Now that your Google Ads UTM parameters are saved in your form submissions, you know exactly where each lead is coming from. Which:
- Channel
- Campaign
- Content
- Term
- Landing page
- Landing page subfolder
If you connect your form builder to a CRM, you can track your leads until they convert into customers. You can then know where each sale is coming from: which channel, source, campaign, content, term, etc.
As a result, you can precisely calculate the Return On Ad Spend (ROAS) for each of your Google Ads campaign, ad, and keyword. How powerful is that!
Then, all you have to do is cancel the campaigns, ads, and keywords that don’t generate revenue, and promote those generating sales. You will see your ROAS skyrocket in no time!
To demonstrate, we will consider the following scenario:
| Source | Google Ads | Facebook ads |
|---|---|---|
| Leads | 50 | 75 |
| Sales | 5 | 6 |
| Avg. Order Value | $150 | $100 |
| Revenue | $750 | $600 |
After running ads on Google and Facebook, LeadSources data shows that Facebook ads generate more leads than Google Ads (75 leads vs. 50 leads).
Since we track our leads in a CRM, we later discovered that, despite fewer leads, Google Ads brought in higher revenue than Facebook ads. This insight led us to shift more of our marketing budget toward Google Ads.
FAQ
Add UTM parameters to your URL from your Google Ads account. When a user clicks your ad, and fills out your form, the UTM parameters are store in your form submission (requires the use of LeadSources). You can then track for each lead the following UTM parameters: source, campaign, term, and content.
Add UTM parameters manually or automatically (using ValueTrack) from your Google Ads account. When a user clicks your ad, the UTM parameters are displayed in your URL. They are stored in Google Analytics on an aggregated level. For a more granular data, you can use LeadSources that tracks the UTM parameters directly in your form, so you can know where each lead is coming from: what source, campaign, term, content, and more.
UTM parameters allows you to track the campaign, ad, keyword, and more that are driving traffic on your site. This allows you to understand where your traffic, leads and sales (when using LeadSources) are coming from. With this data marketers can make educated decisions about their Google Ads strategies: what campaign to promote, what keyword to pause, etc.
👉 LeadSources is compatible with the following form builders:
- 123FormBuilder
- Cognito Forms
- Contact Form 7
- Fillout
- Form Crafts
- FormAssembly
- Formidable Forms
- Forminator
- Forms.app
- FormSite
- Formstack
- GoHighLevel
- Gravity Forms
- HubSpot Forms
- Jotform
- Keap Forms
- Leadpages
- Ninja Forms
- Paperform
- QuestionScout
- Typeform
- Webflow
- WPForms
- Wufoo
- Zoho Forms